Gatsby ビルド時に PostgreSQL のデータ内容を取得して、画面に表示します。
テスト用 DB の作成
テスト用に test_db を作成し、以下のテーブルを作成しました。
- users:ユーザー情報
- comments:投稿情報
users.id と comments.user_id が紐づいています。 ER 図はこんな感じ。

それぞれのテーブルにテストデータを登録します。
users テーブル
| id | username | password | created | modified |
|---|---|---|---|---|
| 1 | 太郎 | aaa | 2019-08-13 11:06:17 | 2019-08-13 11:06:17 |
| 2 | 次郎 | bbb | 2019-08-13 11:07:24 | 2019-08-13 11:07:24 |
| 3 | よしお | ccc | 2019-08-13 11:07:24 | 2019-08-13 11:07:24 |
comments テーブル
| id | uer_id | title | comment | created | modified |
|---|---|---|---|---|---|
| 2 | 1 | aaa | bbb | 2019-08-09 21:06:20 | 2019-08-09 21:06:20 |
| 3 | 1 | 投稿テスト | コメント | 2019-08-10 13:12:32 | 2019-08-10 13:12:32 |
| 4 | 3 | タイトル | COMMENT | 2019-08-12 09:31:42 | 2019-08-12 09:31:42 |
プラグインのインストール
PostgreSQL に接続するため、[gatsby-source-pg]をインストールします。
npm install --save gatsby-source-pgインストール完了後、gatsby-config.js に設定を追加します。 connectionString の書式は postgres://ユーザー名:パスワード@ホスト:ポート番号/データベース名 となります。
gatsby-config.js
module.exports = {
    //他の設定
  plugins: [
    //他のplugin設定
    {
      resolve: "gatsby-source-pg",
      options: {
        connectionString: "postgres://postgres:postgres@localhost:5432/test_db",
        schema: "public",
        refetchInterval: 60,
      },
    },
  ]
}
開発サーバーを起動して GraphiQL にアクセスすると、 postgres が表示され、comments と users が紐づいた状態で取得できます。
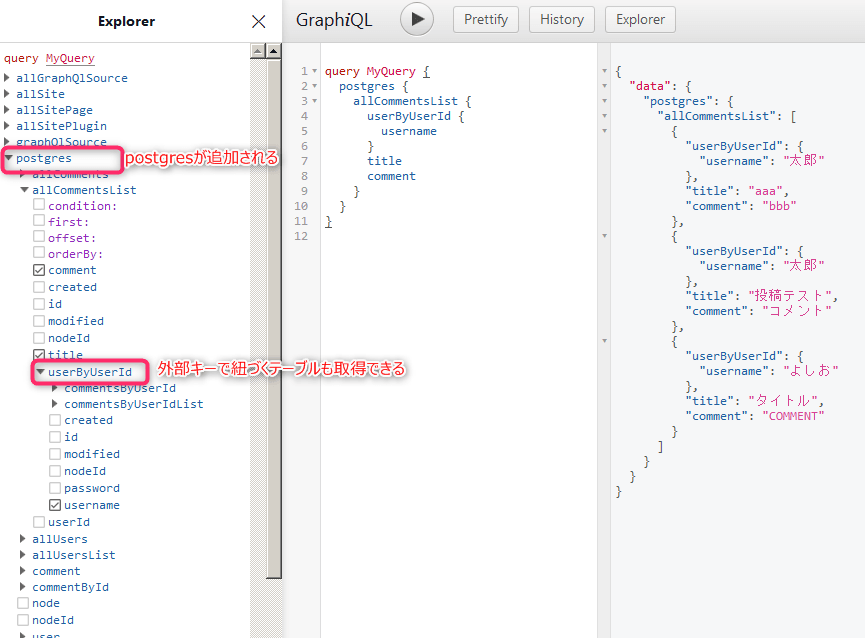
こちらの SQL と同じ結果が取得できます。
select comments.title,comments.comment,users.username
from comments
inner join users
on comments.user_id = users.id
画面に表示する
せっかくなので画面にコメントタイトル、コメント作成日、作成ユーザ名を表示しています。
index.js に GraphQL と結果データの map を記述します。
index.js
import React from "react"
import { graphql } from "gatsby";

/**
 * 取得したcreatedのフォーマットを行う
 * @param {String} created
 */
function getCreated(created){
    const date = new Date(created);
    return date.getFullYear() + "/" +  (date.getMonth() + 1) + "/"+ date.getDate();
}

export default ({ data }) => {
  const { allCommentsList } = data.postgres;
  return (
      <div>
        {/* GraphQLの結果を表示する */}
        {allCommentsList.map(comment => (
            <li key={comment.id}>
                <strong>
                    {comment.title}({getCreated(comment.created)})
                </strong>
                by <em>{comment.userByUserId.username}</em>
            </li>
        ))}
      </div>
  );
};

export const query = graphql`
query MyQuery {
    postgres {
      allCommentsList {
        userByUserId {
          username
        }
        id
        title
        comment
        created
      }
    }
  }
`;
画面にアクセスすると各情報の表示が確認できます。

結合テーブルが増えたり、検索条件が複雑になってくると自分で GraphQL サーバを立てるか、 CSV に出力して読み取った方がわかりやすそう。 ※CSV の読み取りは[gatsby-transformer-csv]プラグインでできるみたいです。