前回と同様、rehypeReact を使って Markdown から変換された HTML に手を加えます。
タグの内容を変える
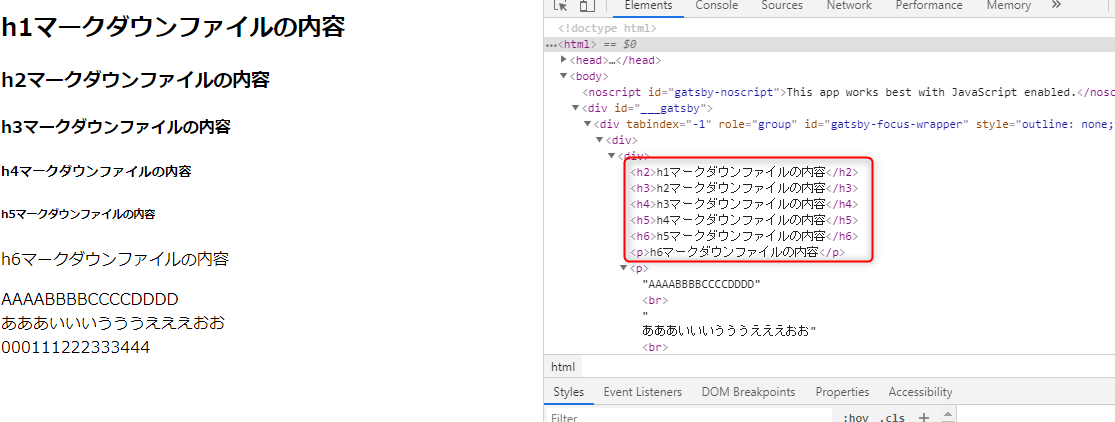
通常、gatsby-transformer-remark はマークダウンに記述した「#」を「h1」タグに変換します。 ただサイトの構成上、画面のタイトルに h1 を利用しておりマークダウンの内容は h2 以下にしたい場合、rehypeReact で変換します。 (h6 はあきらめる)
まずは普通に表示する
プラグイン、ディレクトリ構成は前回のまま引き継いで、 file1.md、index.js を変更します。
# h1マークダウンファイルの内容

## h2マークダウンファイルの内容

### h3マークダウンファイルの内容

#### h4マークダウンファイルの内容

##### h5マークダウンファイルの内容

###### h6マークダウンファイルの内容

AAAABBBBCCCCDDDD
あああいいいうううえええおお
000111222333444
// index.js
import React from "react"
import { graphql } from "gatsby"
import rehypeReact from "rehype-react"
const renderAst = new rehypeReact({
createElement: React.createElement,
// とりあえず変換なし
components: { },
}).Compiler
export default ({ data }) => {
const post = data.markdownRemark
return (
<div>
{renderAst(post.htmlAst)}
</div>
)
}
export const query = graphql`
query {
markdownRemark {
htmlAst
}
}
`開発サーバを起動して、ブラウザを開き h1 タグで表示されていることを確認します。

h タグを変換する
index.js の rehypeReact にタグの変換内容を記述します。
// index.js
import React from "react"
import { graphql } from "gatsby"
import rehypeReact from "rehype-react"

const renderAst = new rehypeReact({
    createElement: React.createElement,
    // hタグを1段下げる
    components: {
        'h1':'h2',
        'h2':'h3',
        'h3':'h4',
        'h4':'h5',
        'h5':'h6',
        'h6':'p',//h6はpに変える
    },
  }).Compiler

export default ({ data }) => {
    const post = data.markdownRemark
    return (
        <div>
            {renderAst(post.htmlAst)}
        </div>
        )
    }

    export const query = graphql`
    query {
        markdownRemark {
            htmlAst
        }
      }
`
画面を確認して、h タグが変換されていることが確認できます。
emotion で CSS を記述する
通常は CSS でスタイルを指定すると思いますが、せっかくなので emotion プラグインを使って CSS を記述します。
まずは、emotion のインストール
npm install --save gatsby-plugin-emotion @emotion/core @emotion/styledgatsby-config.js に emotion を記載
module.exports = {
  plugins: [
    `gatsby-plugin-emotion`,
次に、index.js に h1、h2、h3 に対する CSS を記述します。 h1、h2 は StyledComponents 方式で指定して、h3 には CSSprop 方式で指定してみます(もっといい書き方がありそう)
// index.js
import React from "react"
import { graphql } from "gatsby"
import rehypeReact from "rehype-react"
import styled from '@emotion/styled'
/** @jsx jsx */
import { jsx, css  } from '@emotion/core'

// StyledComponentsでスタイルを指定する
const h1_style = styled.h1`
color: red;
`

//h1タグに変換しつつ、色を変える
const h2_style = styled.h1`
color: blue;
`

// CSSpropでスタイルを指定する
const h3_style = props => {
    return(
        <h3
        css={{
            color: 'green'
        }}
        {...props}
        />
    )
}

const renderAst = new rehypeReact({
    createElement: React.createElement,
    // h1、h2、h3に対する変換マッピング
    components: {
        'h1':h1_style,
        'h2':h2_style,
        'h3':h3_style,
    },
  }).Compiler

export default ({ data }) => {
    const post = data.markdownRemark
    return (
        <div>
            {renderAst(post.htmlAst)}
        </div>
        )
    }

    export const query = graphql`
    query {
        markdownRemark {
            htmlAst
        }
      }
`
開発サーバ再起動後、スタイルが適用されていることが確認できます。